
New Document case
- Anna Young

- Sep 24, 2015
- 10 min read
One of my main reasons for restoring document cases is to learn how they were made my intention has always been to make a new version of one of these cases. I have made a set of templates from the cases I have restored so far to facilitate this.
Over the last few months I have been buying bits here and there thanks to a gift from some friends I have bought this hide.
![DSC_0146[1]](https://static.wixstatic.com/media/04448e_90b4bfc2bcdc4fa99c8f44a10d6dc0f8~mv2.jpg/v1/fill/w_320,h_180,al_c,q_80,enc_avif,quality_auto/04448e_90b4bfc2bcdc4fa99c8f44a10d6dc0f8~mv2.jpg)
It is a J E Sedgewick’s English bridle leather hide just over 11 sq ft the colour is London Tan it is expensive although there is less waste than a standard veg tan hide and the quality is very good.
These are the trigger hooks and buckles I have been using they are made in England from solid brass
![DSC_0057[1]](https://static.wixstatic.com/media/04448e_aa42d1f3683c4c0d9ae23271f6009fde~mv2.jpg/v1/fill/w_320,h_180,al_c,q_80,enc_avif,quality_auto/04448e_aa42d1f3683c4c0d9ae23271f6009fde~mv2.jpg)
The lock set and key are also from the same supplier very shinny
![DSC_0167[1]](https://static.wixstatic.com/media/04448e_e561bdf51bc1400da402fc49dd215271~mv2.jpg/v1/fill/w_320,h_180,al_c,q_80,enc_avif,quality_auto/04448e_e561bdf51bc1400da402fc49dd215271~mv2.jpg)
![DSC_0168[1]](https://static.wixstatic.com/media/04448e_53af347eb2e2461b92b2694581eaaff7~mv2.jpg/v1/fill/w_320,h_180,al_c,q_80,enc_avif,quality_auto/04448e_53af347eb2e2461b92b2694581eaaff7~mv2.jpg)
The handle fittings are also from Abbey England and are cast from solid brass they are quite heavy but look stunning
![DSC_0169[1]](https://static.wixstatic.com/media/04448e_8d14bb4fb76044d1bcff85ea822a9036~mv2.jpg/v1/fill/w_320,h_180,al_c,q_80,enc_avif,quality_auto/04448e_8d14bb4fb76044d1bcff85ea822a9036~mv2.jpg)
I am certain that I have assembled the finest components available in the UK I only hope that I don’t make a mess of the cutting and sewing.
I have completed the first stage of rough cutting of the large leather hide in to the smaller pieces required to make the case.
![DSC_0252[1]](https://static.wixstatic.com/media/04448e_12e5c1e3c72f4114a543f32192ef0c46~mv2.jpg/v1/fill/w_319,h_156,al_c,q_80,enc_avif,quality_auto/04448e_12e5c1e3c72f4114a543f32192ef0c46~mv2.jpg)
Here are all of the hardware components that I will be using to make the case the only item missing is the metal bar that the handle fastens to which I have since managed to acquire.
![DSC_0254[1]](https://static.wixstatic.com/media/04448e_94e8cfa1ad4e4e32ba4ad33b4b4d265c~mv2.jpg/v1/fill/w_320,h_216,al_c,q_80,enc_avif,quality_auto/04448e_94e8cfa1ad4e4e32ba4ad33b4b4d265c~mv2.jpg)
The next step will be the precise cutting of the leather into the exact pieces needed.
As it happens I decided to make the handle first I am using a design which is a mixture of my old Gladstone bag and a video from youtube.
The starting point is three strips of leather glued together and then trimmed into what I could best describe as a triangular tube
![DSC_0365[1]](https://static.wixstatic.com/media/04448e_2e6291dc6ed24d768e3fdafabd0fab24~mv2.jpg/v1/fill/w_320,h_180,al_c,q_80,enc_avif,quality_auto/04448e_2e6291dc6ed24d768e3fdafabd0fab24~mv2.jpg)
I cut another strip of leather to act as the inner piece which runs under the triangular tube around the handle rings then back to the centre this will become clear as we go along.
![DSC_0367[1]](https://static.wixstatic.com/media/04448e_d475cac4a3bd41d8b44b0d1dffdf5af6~mv2.jpg/v1/fill/w_320,h_180,al_c,q_80,enc_avif,quality_auto/04448e_d475cac4a3bd41d8b44b0d1dffdf5af6~mv2.jpg)
This assembly needed to be wrapped in leather I thinned the leather a little prior to gluing this in place.
![DSC_0368[1]](https://static.wixstatic.com/media/04448e_32bd9dd2ba1244478a9e0587c4454171~mv2.jpg/v1/fill/w_320,h_180,al_c,q_80,enc_avif,quality_auto/04448e_32bd9dd2ba1244478a9e0587c4454171~mv2.jpg)
I glued this together in small sections top help me get things stuck in the correct place.
![DSC_0369[1]](https://static.wixstatic.com/media/04448e_b484769ea4404fdc9bc10647aeaf05c4~mv2.jpg/v1/fill/w_320,h_180,al_c,q_80,enc_avif,quality_auto/04448e_b484769ea4404fdc9bc10647aeaf05c4~mv2.jpg)
This picture will give a better idea of how the finished handle will look the two long ends will be folded underneath and the long sides will fold around them and be glued and sewn in place.
![DSC_0370[1]](https://static.wixstatic.com/media/04448e_418cc37e9efd4b1d8f0ad48f2709281f~mv2.jpg/v1/fill/w_320,h_180,al_c,q_80,enc_avif,quality_auto/04448e_418cc37e9efd4b1d8f0ad48f2709281f~mv2.jpg)
This is the underneath of the long end
![DSC_0373[1]](https://static.wixstatic.com/media/04448e_9733429fe5d7406898f688bb53fba96e~mv2.jpg/v1/fill/w_320,h_180,al_c,q_80,enc_avif,quality_auto/04448e_9733429fe5d7406898f688bb53fba96e~mv2.jpg)
Now that you have the idea I will add some detail the inside size of the handle rings is 22 mm the outer leather is 2 mm thick so my inner strip should have been 18 mm I reduced that to 16mm to give me some clearance.
![DSC_0376[1]](https://static.wixstatic.com/media/04448e_8fbabc71546c45489885b93541564ff8~mv2.jpg/v1/fill/w_320,h_180,al_c,q_80,enc_avif,quality_auto/04448e_8fbabc71546c45489885b93541564ff8~mv2.jpg)
As you can see it is a tight fit so the extra 2mm of clearance has disappeared
The two long ends fold under and meet in the middle ( excuse the fingers)
![DSC_0374[1]](https://static.wixstatic.com/media/04448e_6774be62d166423587fd6235dbb38b18~mv2.jpg/v1/fill/w_320,h_180,al_c,q_80,enc_avif,quality_auto/04448e_6774be62d166423587fd6235dbb38b18~mv2.jpg)
Here is the handle after the sides have been folded under and sewn in place
![DSC_0379[1]](https://static.wixstatic.com/media/04448e_cbff409ae1c243259702881f98cfbed6~mv2.jpg/v1/fill/w_320,h_180,al_c,q_80,enc_avif,quality_auto/04448e_cbff409ae1c243259702881f98cfbed6~mv2.jpg)
The final sewing is along the sides of the upper piece of the handle the green in the background is for the interior and I had planned on green thread although I am having second thoughts about the thread
![DSC_0384[1]](https://static.wixstatic.com/media/04448e_4ca97cb9883b47c98af89575708243fa~mv2.jpg/v1/fill/w_319,h_188,al_c,q_80,enc_avif,quality_auto/04448e_4ca97cb9883b47c98af89575708243fa~mv2.jpg)
I have set aside my doubts about the green thread and have finished sewing the handle
![DSC_0387[1]](https://static.wixstatic.com/media/04448e_bd9abffcb37646c4b20abe800746e728~mv2.jpg/v1/fill/w_320,h_180,al_c,q_80,enc_avif,quality_auto/04448e_bd9abffcb37646c4b20abe800746e728~mv2.jpg)
![DSC_0386[1]](https://static.wixstatic.com/media/04448e_190b57a534d0461a90d00b2266661e6a~mv2.jpg/v1/fill/w_320,h_180,al_c,q_80,enc_avif,quality_auto/04448e_190b57a534d0461a90d00b2266661e6a~mv2.jpg)
I am very happy with the way this has turned out however I don’t think you will be able to see it until it is part of the case.
Now the handle is finished I need to take a deep breath and start cutting the expensive stuff.
I made my template from a case that I sold to fund this project when I came to cut the curve for the front flap they did not look even. I made a single corner to check and they were in fact uneven
![DSC_0390[1]](https://static.wixstatic.com/media/04448e_c222d732e17347c8aad988504dc8f97f~mv2.jpg/v1/fill/w_320,h_180,al_c,q_80,enc_avif,quality_auto/04448e_c222d732e17347c8aad988504dc8f97f~mv2.jpg)
Once I was happy I clamped the template in place and cut the shape
![DSC_0391[1]](https://static.wixstatic.com/media/04448e_b53baf54a0f14b4eb61361390d5bdc31~mv2.jpg/v1/fill/w_320,h_180,al_c,q_80,enc_avif,quality_auto/04448e_b53baf54a0f14b4eb61361390d5bdc31~mv2.jpg)
Once the back section was cut out I turned my attention to the gusset piece I started with a piece of hide which I had rough cut to around 160mm and the full length of the hide.
![DSC_0393[1]](https://static.wixstatic.com/media/04448e_9c9abc00751947ea881ff8d1cd6287bc~mv2.jpg/v1/fill/w_320,h_180,al_c,q_80,enc_avif,quality_auto/04448e_9c9abc00751947ea881ff8d1cd6287bc~mv2.jpg)
I used a grooving tool to mark the areas of the gusset that I wanted to bend I also added some water to help the leather to take the shape required
![DSC_0397[1]](https://static.wixstatic.com/media/04448e_4268a2743fe64568a0b488ff171f629e~mv2.jpg/v1/fill/w_320,h_180,al_c,q_80,enc_avif,quality_auto/04448e_4268a2743fe64568a0b488ff171f629e~mv2.jpg)
Even with the addition of some water and the groves to weaken the leather it was still very difficult to force the leather to bend in this way. I am sure there is an easier way to achieve this I could have made the gusset in pieces but this is the look I was after.
When the gusset piece has dried I will skive the ends and start to think about adding the lining
![DSC_0404[1]](https://static.wixstatic.com/media/04448e_20154702786c49249ce768c15a60e1d9~mv2.jpg/v1/fill/w_320,h_180,al_c,q_80,enc_avif,quality_auto/04448e_20154702786c49249ce768c15a60e1d9~mv2.jpg)
These are the front and rear panels cut out ready for lining
![DSC_0400[1]](https://static.wixstatic.com/media/04448e_711f374b8d6d49b3b130cc83e0ca3a22~mv2.jpg/v1/fill/w_320,h_180,al_c,q_80,enc_avif,quality_auto/04448e_711f374b8d6d49b3b130cc83e0ca3a22~mv2.jpg)
I had planned to show the lining today unfortunately I realised that I did not have enough suede to do the whole project so I have ordered another hide which fingers crossed will be here tomorrow.
So as not to waste any time I started on the small stuff straps and buckle mounts as well as the anchor points for the shoulder strap.
As you can see I made an error in the marking out the inner marks were correct so I cut out both pieces.
![DSC_0412[1]](https://static.wixstatic.com/media/04448e_cbeb62f7b7ec4bd3972a77847d8c4b2c~mv2.jpg/v1/fill/w_320,h_180,al_c,q_80,enc_avif,quality_auto/04448e_cbeb62f7b7ec4bd3972a77847d8c4b2c~mv2.jpg)
This is where I started the anchor points I scrapped the first effort which would have mounted between the divider and the back panel. I was worried about the stress on the leather so went to mk 2 which mounts over the outside of the divider this is the same approach I have used on the restoration projects.
Straps and buckle mounts are essentially the same thing my plan is to use the long ends of the buckle mounts to give a padded look to the fixed end.
![DSC_0413[1]](https://static.wixstatic.com/media/04448e_d2ebc07dae8d4d39861bb26b441c13ea~mv2.jpg/v1/fill/w_320,h_180,al_c,q_80,enc_avif,quality_auto/04448e_d2ebc07dae8d4d39861bb26b441c13ea~mv2.jpg)
After cutting out and smoothing the edges I sealed the cut edges with a special sealer
![DSC_0418[1]](https://static.wixstatic.com/media/04448e_67969cc870c245f3883da53db061d002~mv2.jpg/v1/fill/w_320,h_180,al_c,q_80,enc_avif,quality_auto/04448e_67969cc870c245f3883da53db061d002~mv2.jpg)
These are the buckle mounts
![DSC_0422[1]](https://static.wixstatic.com/media/04448e_6abe90496c934778b682468dd47e266b~mv2.jpg/v1/fill/w_320,h_180,al_c,q_80,enc_avif,quality_auto/04448e_6abe90496c934778b682468dd47e266b~mv2.jpg)
I marked out a centre line on the inside of the front panel to position the lock unit it has six fold over tabs on the back along with a backing plate to secure it in place.
![DSC_0423[1]](https://static.wixstatic.com/media/04448e_7ffc26f8ab1c4ae8b117ab0fedbb86ce~mv2.jpg/v1/fill/w_320,h_180,al_c,q_80,enc_avif,quality_auto/04448e_7ffc26f8ab1c4ae8b117ab0fedbb86ce~mv2.jpg)
I used the backing plate to mark out the holes for these tabs. As I don’t have the special tool to punch the oblong hole with rounded ends I used a 2mm hole punch and punched multiple hole to form the slots.
![DSC_0425[1]](https://static.wixstatic.com/media/04448e_669239b2fc4743e0a61a079b0367c711~mv2.jpg/v1/fill/w_320,h_180,al_c,q_80,enc_avif,quality_auto/04448e_669239b2fc4743e0a61a079b0367c711~mv2.jpg)
I wanted to place the buckles on the horizontal line in the centre of the lock so I made marks accordingly.
![DSC_0428[1]](https://static.wixstatic.com/media/04448e_cab844ff6df64d38a77de3f940c67fd3~mv2.jpg/v1/fill/w_320,h_180,al_c,q_80,enc_avif,quality_auto/04448e_cab844ff6df64d38a77de3f940c67fd3~mv2.jpg)
My original plan had been to put the tail end of the mounting piece just behind the front having re read the book of cases by Al Stolman. I decided to make a slot and feed the tail through to the back of the front panel and put a rivet in place to secure it.
![DSC_0431[1]](https://static.wixstatic.com/media/04448e_e587ee56d09141029c35aba2b6bd13b5~mv2.jpg/v1/fill/w_320,h_180,al_c,q_80,enc_avif,quality_auto/04448e_e587ee56d09141029c35aba2b6bd13b5~mv2.jpg)
This is how the finished piece should look
![DSC_0430[1]](https://static.wixstatic.com/media/04448e_4b9b31c450314c35aef1a2166c6d71ac~mv2.jpg/v1/fill/w_320,h_180,al_c,q_80,enc_avif,quality_auto/04448e_4b9b31c450314c35aef1a2166c6d71ac~mv2.jpg)
I marked out stitching holes with a pricking iron on both the front and tail pieces and fixed the rivets in place
![DSC_0433[1]](https://static.wixstatic.com/media/04448e_b63ced8c18984784aba2e265cea06d30~mv2.jpg/v1/fill/w_320,h_180,al_c,q_80,enc_avif,quality_auto/04448e_b63ced8c18984784aba2e265cea06d30~mv2.jpg)
3 pm this afternoon the suede I ordered yesterday arrived
![DSC_0434[1]](https://static.wixstatic.com/media/04448e_fb574796443e4d46929da3c12680451a~mv2.jpg/v1/fill/w_320,h_180,al_c,q_80,enc_avif,quality_auto/04448e_fb574796443e4d46929da3c12680451a~mv2.jpg)
I spent the rest of the afternoon sewing the buckle mounts in place.
Today I fitted the suede to the inside of some of the pieces the back panel needs the handle fitted before I can go any further. The piece of metal I have is a little wider that I would like at 20 mm my ideal would have been 15 mm I splashed out and bought stainless steel so cutting 5 mm off with a hacksaw is not an option either as it is very hard.
Todays other problem is I have fitted the lock lower than I had intended. I got it in my head that I wanted the centre of the lock in line with the centre of the buckles not thinking that the flap might not be long enough. Too late now. There is no spare leather so I cannot remake the front panel I have tried the back and front together and it looks ok so fingers crossed
![DSC_0442[1]](https://static.wixstatic.com/media/04448e_222489d91a2246c49616e9cb13a31dd0~mv2.jpg/v1/fill/w_320,h_180,al_c,q_80,enc_avif,quality_auto/04448e_222489d91a2246c49616e9cb13a31dd0~mv2.jpg)
I did a dry fit today just to put my mind to rest
![DSC_0447[1]](https://static.wixstatic.com/media/04448e_871436b4775a4ca6a8322208e98cc00e~mv2.jpg/v1/fill/w_320,h_180,al_c,q_80,enc_avif,quality_auto/04448e_871436b4775a4ca6a8322208e98cc00e~mv2.jpg)
![DSC_0443[1]](https://static.wixstatic.com/media/04448e_27f589de325246d4ab1e6e9895e09f2d~mv2.jpg/v1/fill/w_320,h_180,al_c,q_80,enc_avif,quality_auto/04448e_27f589de325246d4ab1e6e9895e09f2d~mv2.jpg)
I am a little worried that the handle might be too large so I am having a think about making a smaller one.
I have turned my attention to the shoulder strap in the last few days. I f money was a factor then the strap would have one buckle for adjustment and no stitching for effect.
Well that does not apply here so I am fully stitching the strap and there will be a buckle on each side. The buckles are solid brass and come from Abbey England.
Using my strap cutter I cut two straps from the original hide. here is the starting point
![DSC_0452[1]](https://static.wixstatic.com/media/04448e_24036bb60c064887882425d6e55f46ee~mv2.jpg/v1/fill/w_320,h_180,al_c,q_80,enc_avif,quality_auto/04448e_24036bb60c064887882425d6e55f46ee~mv2.jpg)
My newest tool is a strap end cutter It makes life a little easier
![DSC_0453[1]](https://static.wixstatic.com/media/04448e_0cf7328fe6e644b2b66e4116be122438~mv2.jpg/v1/fill/w_320,h_180,al_c,q_80,enc_avif,quality_auto/04448e_0cf7328fe6e644b2b66e4116be122438~mv2.jpg)
The next steps include making a grove for the stitches marking the stitching holes with a pricking iron at 8 stitches per inch.I also punched the holes for the buckles.
![DSC_0455[1]](https://static.wixstatic.com/media/04448e_a23b5e06aa4b40f1988df17cabee4967~mv2.jpg/v1/fill/w_320,h_180,al_c,q_80,enc_avif,quality_auto/04448e_a23b5e06aa4b40f1988df17cabee4967~mv2.jpg)
The final step for this strap is to sew along the edges it is just for show but I think it looks good.
![DSC_0458[1]](https://static.wixstatic.com/media/04448e_6ad792f0631e4427af0fecf9711fbb14~mv2.jpg/v1/fill/w_320,h_180,al_c,q_80,enc_avif,quality_auto/04448e_6ad792f0631e4427af0fecf9711fbb14~mv2.jpg)
To join the strap to the case we need some mounting points these a short straps with a buckle on one end and a trigger hook on the other. Like this.
![DSC_0460[1]](https://static.wixstatic.com/media/04448e_5bf032c0f81046cda4e18e87fb1b6f53~mv2.jpg/v1/fill/w_320,h_180,al_c,q_80,enc_avif,quality_auto/04448e_5bf032c0f81046cda4e18e87fb1b6f53~mv2.jpg)
To make this piece as strong as possible I use a six inch long piece of leather and fold the ends into the centre I dry fitted the pieces and marked where the stitching starts and stops. The I cut the groves for the stitching and marked the holes as for the strap.
I added some contact cement placed the buckle and trigger hook at either end added some pressure and finally some thread.
![DSC_0467[1]](https://static.wixstatic.com/media/04448e_a438ac612dd64e6a9f0e586469052d79~mv2.jpg/v1/fill/w_320,h_180,al_c,q_80,enc_avif,quality_auto/04448e_a438ac612dd64e6a9f0e586469052d79~mv2.jpg)
Finally the finished items strap and mounts

Having finished the strap I needed to attach the mounts in order to do that I had to sew the centre divider in place . I realised that the holes for the Chicago screws were very close to the joint which made it very tight lesson learned. I later discovered that I had not allowed for the thickness of the centre divider when making the mounts I had to soak the mounts to get them to stretch just enough to allow the Chicago screws to pass through.

This process has taken me two days to complete I did leave a screw driver mark on the back of one of the mounts which was unfortunate it is not the end of the world as it is my own case, if it does start to bother me I can make a replacement but it is very difficult to get them out so I am not in a rush to do it.

Here is the centre divider with the attachments fitted.

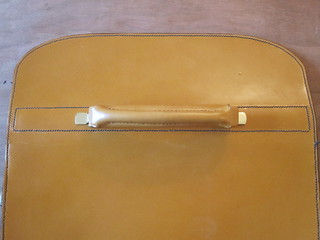
The next step is to fit the handle to the back panel I have been avoiding this for some time now but I reached the point where I have to do it.
I have to be honest the handle was not as difficult to fit as I thought.
The metal plate was marked and drilled first then I transferred those marks to the leather and punched the holes.
![DSC_0448[1]](https://static.wixstatic.com/media/04448e_292a6604246a44c8b213453ff137755f~mv2.jpg/v1/fill/w_320,h_180,al_c,q_80,enc_avif,quality_auto/04448e_292a6604246a44c8b213453ff137755f~mv2.jpg)

I covered the metal plate with a thin piece of leather so I marked out lines of stitching to secure it in place.
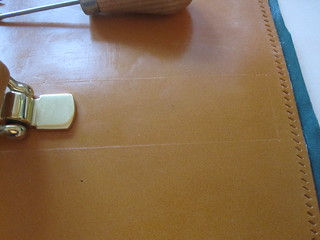

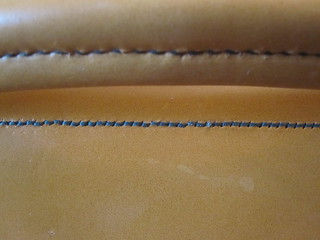
Over the last few days I have sewn the detail around the front flap and then the back panel to the centre section

There is an area around the handle where I am very unhappy with the stitching I may well unpick this at some point.
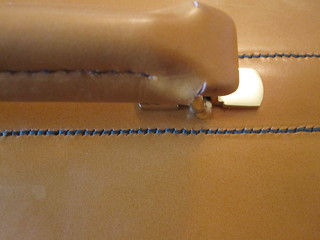
I know it is not the end of the world and I am trying to live with it but I think it may well be re done.

It does not look too bad from a distance
Good news I have not unpicked everything “YET” in fact I have proceeded to attach the front.
At some point this case will be finished but first I need to overcome a few issues.
I trained as a metal worker in my youth over 30 years ago as part of that I did learn about riveting although I have never done it since and it was using heavy machinery.
I have bought a few packs of rivets trying to find a suitable match in the end I have settled on 3/32 of an inch they were too long so each one had to be cut to size.
They were also unpolished so each round head had to be polished but I only need three (there is 50 in a pack).

Here is the lock hasp riveted in place I used a piece of thick leather to protect the round head from being flattened as the other end was struck with a mini ball pein hammer.
Edges are also difficult but I will come back to them later.
The final issue by issue I mean things I think are difficult and don’t want to do :). Fastening straps and where to put them and lining them up.
I decided to wait until I had the hasp fixed in place this allowed me an excuse to put off doing it. Once I had the rivets and they were ready I had no more excuses. I fastened the straps in the buckles in the tightest hole and fastened the hasp in its tightest hole and tried to match up my previous holes marked earlier. one fit one was 1 mm out.

I used a pair of needles to match the holes and used a contact cement to fix them in place sewing them in place will be one of the final jobs on this project.
After I have finished the edges… there are many different stages to finishing the edges of leather I often refer to it as a dark art as everyone seems to have their own secret ways of doing it.
In an ideal world leather would be cut with a very sharp knife the square corners removed with an edge tool and seal it with edge kote.
When joing multiple edges it is necessary to sand and then slick them to make them smooth.
I am going to come back to this with some pictures to explain it in more detail.
Ok edges as promised I made a shoulder pad previously which in hindsight was a little on the large size.
This has been bugging me as it looked odd so I decided to kill two birds with one stone.
![DSC_0551[1]](https://static.wixstatic.com/media/04448e_f8d5bd280ddc4a62babd8026e2920d63~mv2.jpg/v1/fill/w_320,h_180,al_c,q_80,enc_avif,quality_auto/04448e_f8d5bd280ddc4a62babd8026e2920d63~mv2.jpg)
![DSC_0554[1]](https://static.wixstatic.com/media/04448e_76497dac2a71471cafbc70d874eba6c0~mv2.jpg/v1/fill/w_320,h_180,al_c,q_80,enc_avif,quality_auto/04448e_76497dac2a71471cafbc70d874eba6c0~mv2.jpg)
If you look closely at the second picture you can see that I have marked out the stitching line with a pair of dividers. Trimming the padding was a little tricky but we wont go there.
These are the next tools required on the right is the edge trimmer which cuts the corners off.
![DSC_0555[1]](https://static.wixstatic.com/media/04448e_c81f7eaec6f0495889e2792b89c78fab~mv2.jpg/v1/fill/w_320,h_180,al_c,q_80,enc_avif,quality_auto/04448e_c81f7eaec6f0495889e2792b89c78fab~mv2.jpg)
After the corners are trimmed the edges are dampened a little and the slicking tool is used.
From this picture you can see the cut edge which has been sanded and the corners have been removed using the edging tool it is gaping a little so I will marl the stitching holes and sew it before I go on.
![DSC_0576[1]](https://static.wixstatic.com/media/04448e_1066738c1bae4d789fc2dc06b73ae771~mv2.jpg/v1/fill/w_320,h_180,al_c,q_80,enc_avif,quality_auto/04448e_1066738c1bae4d789fc2dc06b73ae771~mv2.jpg)
The stitches have been marked out and I have sewn all around.
![DSC_0590[1]](https://static.wixstatic.com/media/04448e_952dfa15c1b14afda54a785a712e925c~mv2.jpg/v1/fill/w_320,h_180,al_c,q_80,enc_avif,quality_auto/04448e_952dfa15c1b14afda54a785a712e925c~mv2.jpg)
The edges have been dampened and the slicking tool has been rubbed over them vigorously to create friction which causes the edge to form to the round shape of the tool. This also causes the fibres of the edge to become smooth and shinny.
These edges are now ready for painting with edge kote.

The edges have now been sealed with the edge kote
Here is the strap with the rest of the case it is not finished yet I still need to sew the four main corners around the outer edge I will show this later.

Trigger hooks

These end folds are very difficult to get right

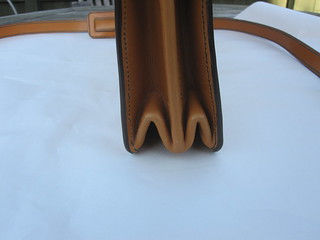
Emerald green suede interior


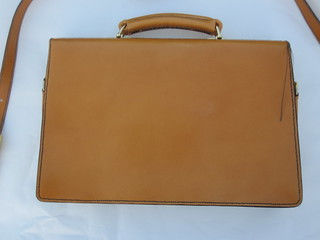
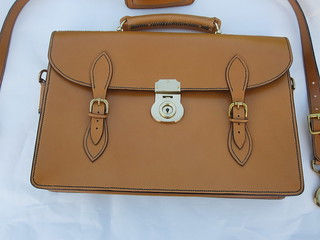
This project has been an absolute joy to make working with what I believe are the finest materials available The leather and brassware are made in the UK the thread is from Germany. I will be posting the final pictures soon.
This case is not looking for a new home as it is mine if anyone would like one then please feel free to get in touch.


Comments